Quick Start
In about 5 minutes you'll have Chaos Cypher running, your first document imported, and search working. Entity extraction and AI chat need a one-time chat-model download (~18–20 GB) — you'll kick that off in step 1 and come back to it while it runs.
| Works within ~5 minutes | Comes online after the chat-model pull |
|---|---|
| Start the container and sign in | Entity extraction (the knowledge graph) |
| Upload + index a document (~30s per 100 pages) | AI chat with citations |
| Search — keyword + semantic |
The small models used for indexing and search (an embedding model and a reranker, ~600 MB each) download automatically on first use.
1. Start the services — and the model download
Start the all-in-one container from the published image:
docker run -d --name chaoscypher \
  -p 80:80 \
  -p 443:443 \
  -v chaoscypher-data:/data \
  ghcr.io/chaoscypherinc/chaoscypher:latest
While that starts, kick off the chat-model download in a second terminal:
ollama pull qwen3:30b-instruct
qwen3:30b-instruct is a ~18–20 GB download — the single longest part of setup. Importing and searching documents (steps 2–3) do not wait on it; entity extraction and chat (steps 4–5) do. Starting the pull now means the graph features are ready by the time you want them. Ollama must be installed and running — see Installation for details or alternative providers.
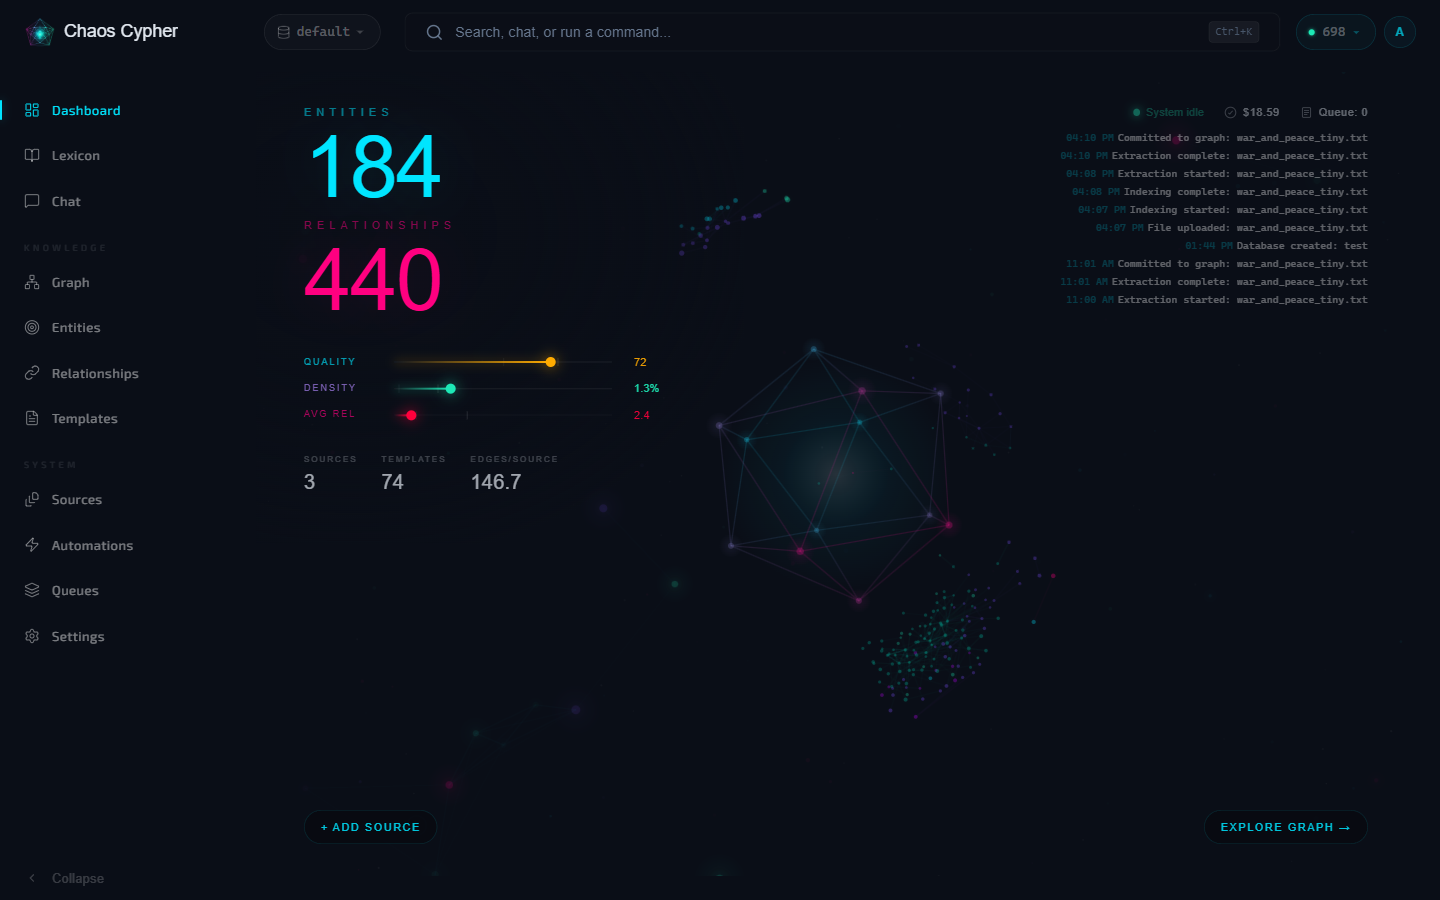
Wait for the container to become healthy, then open http://localhost. After signing in (first run prompts you to set a username and password), you land on the Dashboard — a live overview of your graph with entity, relationship, source, and quality counts plus a recent-activity feed.
If you cloned the repository, make docker-up builds and starts the same all-in-one container locally. The first build takes a few minutes; subsequent starts are faster.
When the container first starts, your browser shows a startup page with live health indicators for each service (Nginx, Cortex, Valkey, Neuron). The page auto-redirects to the application once all services are healthy — typically 30-60 seconds on first start.
If you're using the multi-container dev setup (make docker-dev), the UI is at http://localhost:3000 and the API at http://localhost:8080 instead.
The curl examples below use localhost:8080, which is the direct Cortex API port used in dev mode. If you are running the all-in-one deployment, replace 8080 with port 80 — i.e., use http://localhost/api/v1/... instead.
2. Upload a document
- Web UI
- CLI
- Python
- API
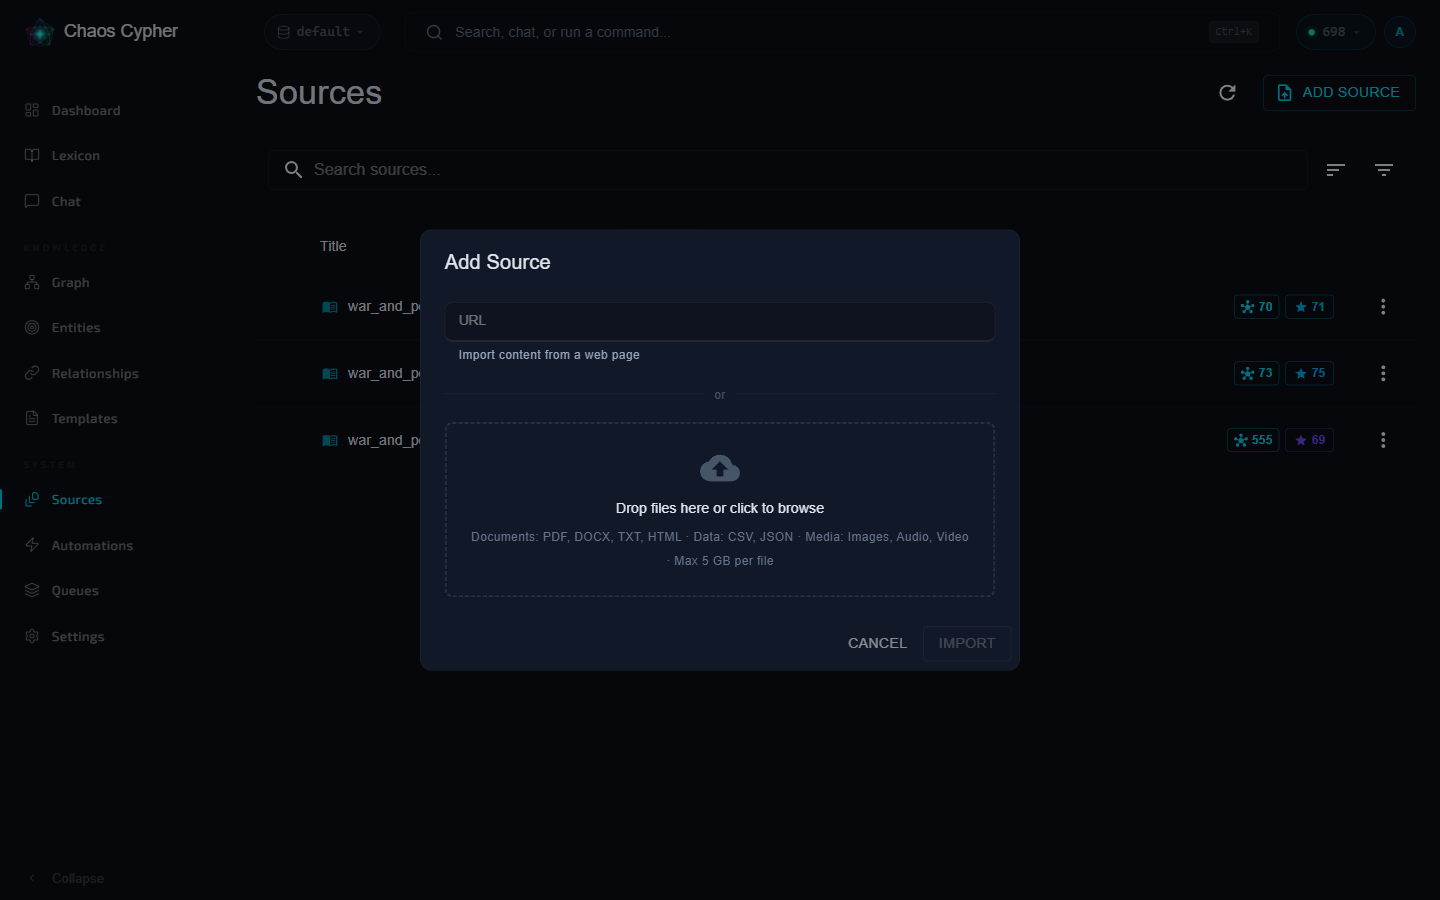
- Navigate to Sources in the sidebar
- Click Add Source — in the dialog, drag-and-drop a PDF, Word document, or text file (or paste a URL to import a web page)
- The file uploads and indexing starts immediately. Once the text is analyzed, a Review dialog proposes an extraction domain (technical, medical, legal, …) detected from the content — click Confirm to queue entity extraction
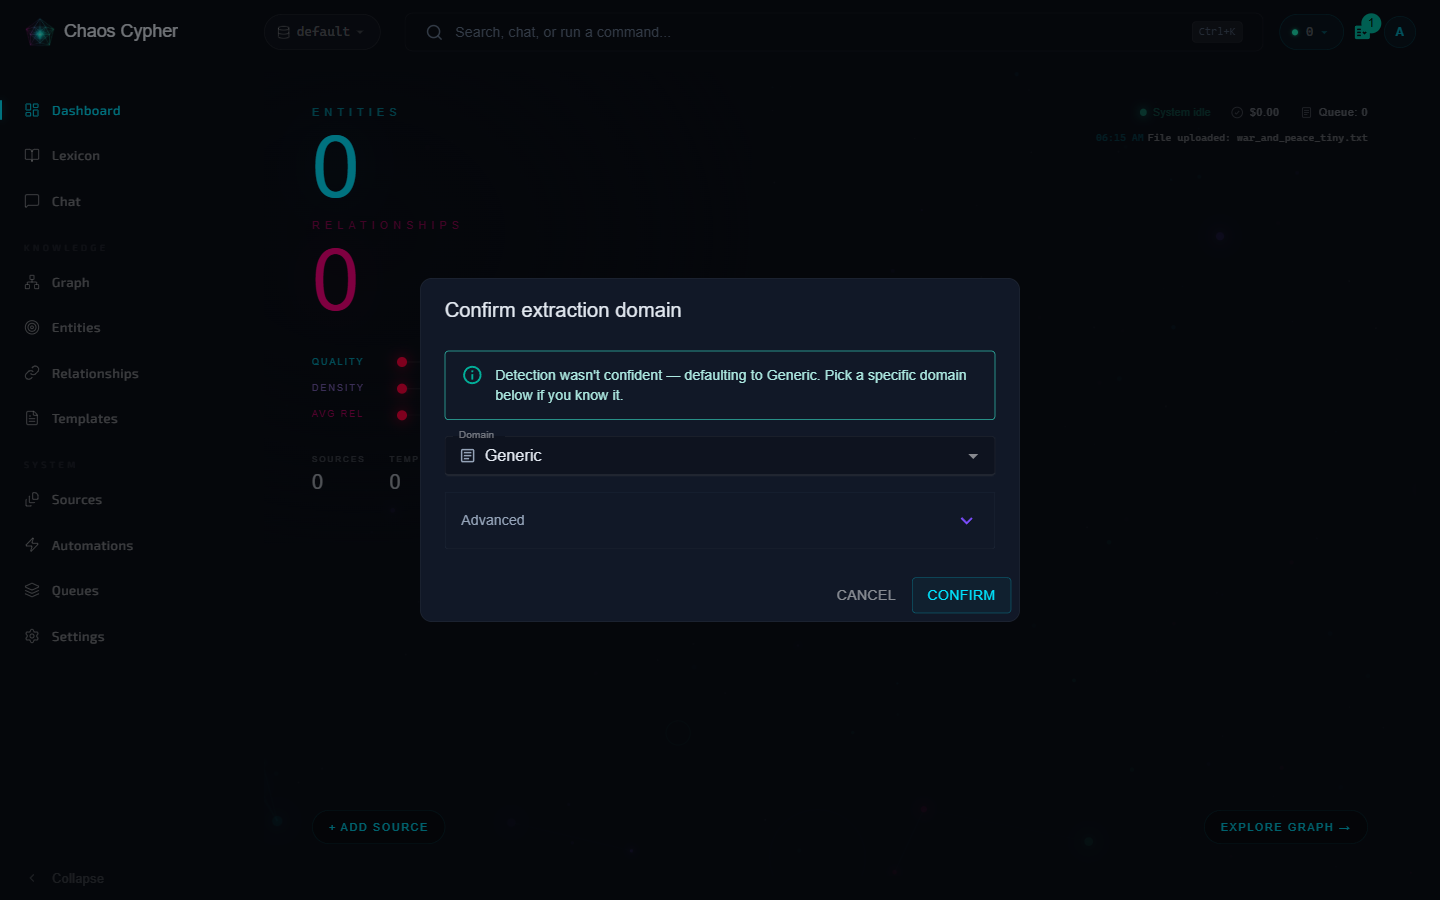
If you close the Review dialog, the source simply waits at awaiting confirmation — indexing and search are unaffected. Confirm the domain any time from the source's action menu.
chaoscypher source add document.pdf
The CLI runs the full pipeline (upload → index → extract → commit) and shows a progress bar for each stage. It proposes the detected extraction domain and asks you to confirm before extracting — pass --no-confirm to accept the proposal automatically.
from chaoscypher_core import ChaosCypher

result = ChaosCypher.add_document_sync("document.pdf")
print(f"Created {len(result.nodes)} nodes, {len(result.edges)} edges")
curl -X POST http://localhost:8080/api/v1/sources \
  -F "file=@document.pdf"
Response 202 Accepted:
{
  "id": "src_abc123",
  "filename": "document.pdf",
  "status": "pending",
  "file_type": "pdf",
  "file_size": 204800,
  "created_at": "2026-03-09T14:30:00"
}
The source enters the processing pipeline automatically. Poll its status with GET /api/v1/sources/{id} and watch the status field progress through the pipeline stages.
The processing pipeline has three stages:
| Stage | What happens | Time |
|---|---|---|
| Indexing | Chunking + embedding for search | ~30s per 100 pages (the very first run adds a one-time ~600 MB embedding-model download) |
| Domain confirmation | You confirm the proposed extraction domain | One click |
| Entity Extraction | AI extracts entities and relationships | ~5min per 100 pages — needs the chat model from step 1 |
Watch the status badge on your source file:
indexing → indexed (→ awaiting_confirmation until you confirm) → extracting → extracted → committing → committed
3. Search your documents
Once a source reaches indexed status, you can search it — no need to wait for extraction:
- Web UI
- CLI
- Python
- API
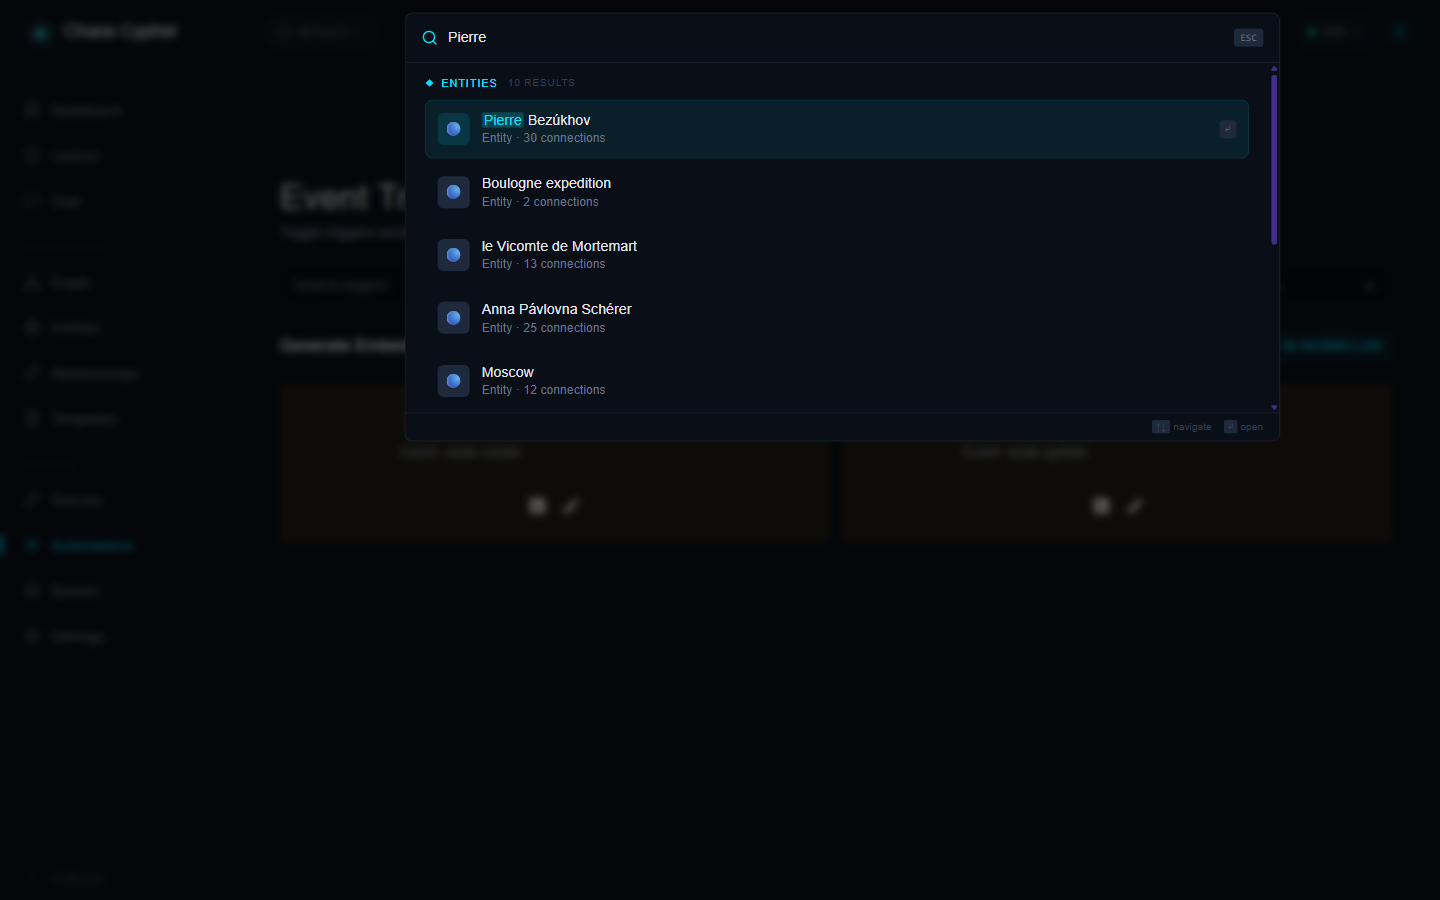
- Press Ctrl+K (⌘K on macOS) or click the search bar in the top bar to open the omnibar
- Type a query (two or more characters) — results come from both keyword and semantic (vector) search, grouped into Entities, Sources, and Chunks
- Click an entity to open it, a source to view it, or a chunk to jump to the matching text in its source
The very first search may pause briefly while the reranker model (~600 MB) downloads.
chaoscypher source search "your query here"
Supports --mode keyword, --mode semantic, or --mode hybrid (default).
from chaoscypher_core import ChaosCypher

results = ChaosCypher.search_sync("your query here")
for r in results:
    print(f"{r.score:.3f}  {r.label}")
curl "http://localhost:8080/api/v1/search?q=your+query+here&search_type=hybrid"
Response 200 OK:
{
  "data": [
    {
      "result_type": "chunk",
      "score": 0.89,
      "chunk": {
        "content": "The key findings indicate...",
        "filename": "document.pdf",
        "page_number": 3,
        "section": "Introduction"
      },
      "node": null
    }
  ],
  "type": "hybrid"
}
Available search_type values: keyword, semantic, hybrid. Add &limit=10 to control result count.
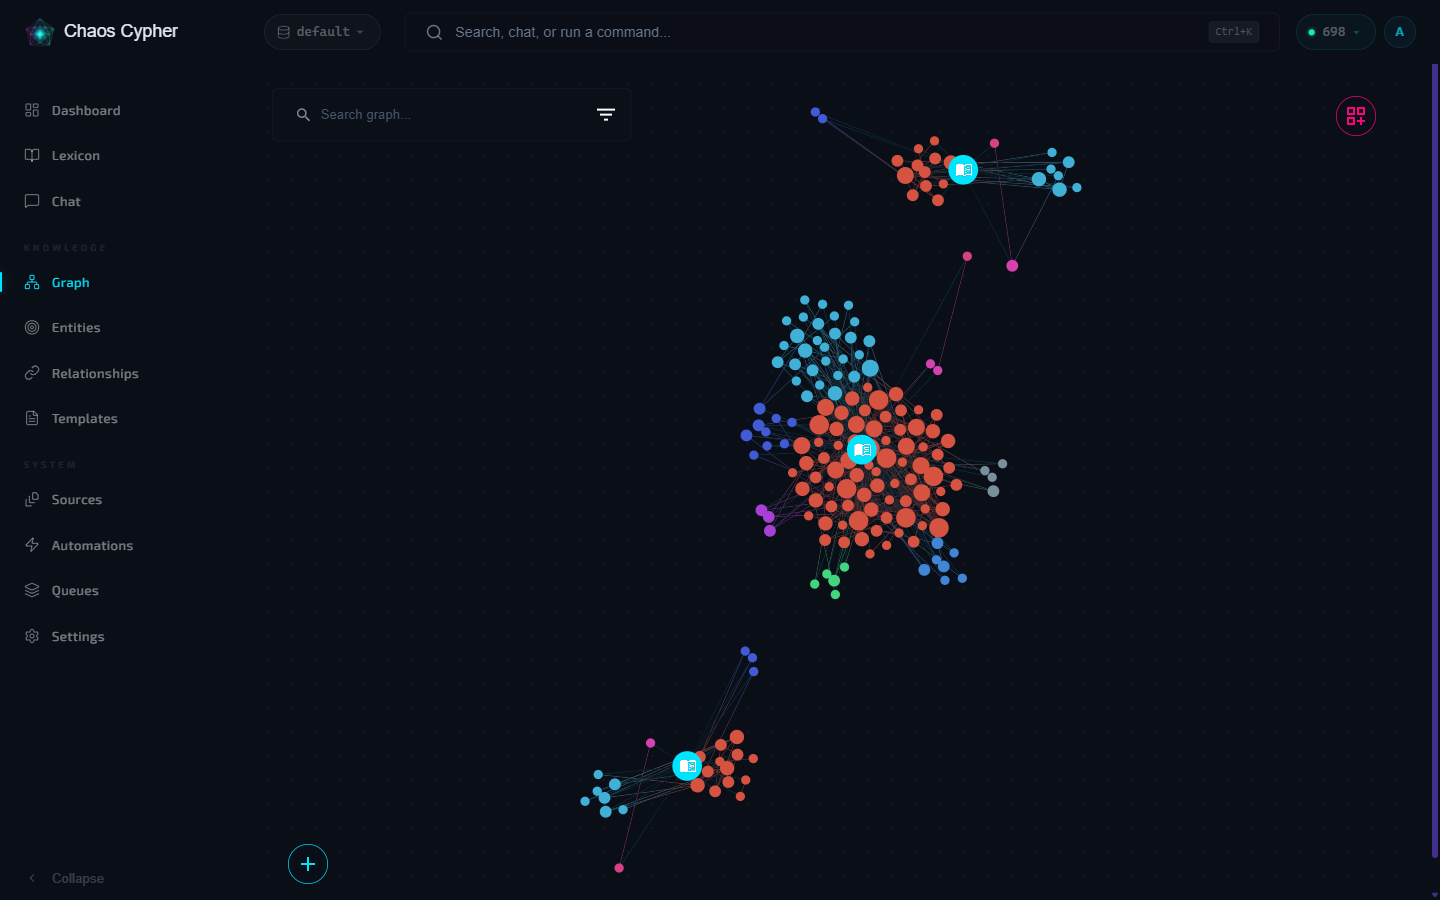
4. Explore the knowledge graph
Once extraction is committed (this is the stage that needs the chat model from step 1), entities and relationships appear in the graph:
- Web UI
- CLI
- Python
- API
- Navigate to Graph in the sidebar
- The canvas shows extracted nodes (entities) and edges (relationships)
- Click a node to see its properties, connected entities, and source evidence
- Use the search bar to find specific entities
- Try different layout options from the toolbar
# List all nodes
chaoscypher graph node list

# View a specific node with its connections
chaoscypher graph node get NODE_ID --include-links

# Search for entities
chaoscypher source search "entity name"
from chaoscypher_core import Engine

with Engine("./data/databases/default") as engine:
    result = engine.list_nodes()
    for node in result.data:
        print(f"{node.label} ({node.template_id})")

    stats = engine.get_stats()
    print(f"Graph: {stats.nodes} nodes, {stats.edges} edges")
# List all nodes
curl "http://localhost:8080/api/v1/nodes?page=1&page_size=20&include_stats=true"

# Get a specific node with its connections
curl http://localhost:8080/api/v1/nodes/{node_id}/connections
Response 200 OK (list nodes):
{
  "data": [
    {
      "id": "node-a1b2c3d4",
      "template_id": "person",
      "label": "Albert Einstein",
      "properties": {"field": "Physics"},
      "edge_count": 12,
      "citation_count": 3
    }
  ],
  "pagination": {"page": 1, "page_size": 20, "total": 87}
}
Use GET /api/v1/counts for a quick summary of nodes, edges, templates, and sources.
5. Chat with your documents
Chat uses the same model as extraction — if the pull from step 1 is still running, give it a few more minutes.
- Web UI
- CLI
- Python
- API
- Navigate to Chat in the sidebar
- Start a new conversation
- Ask a question about your uploaded document
The AI uses RAG to search your indexed content and provides answers with citations linking back to specific source chunks.
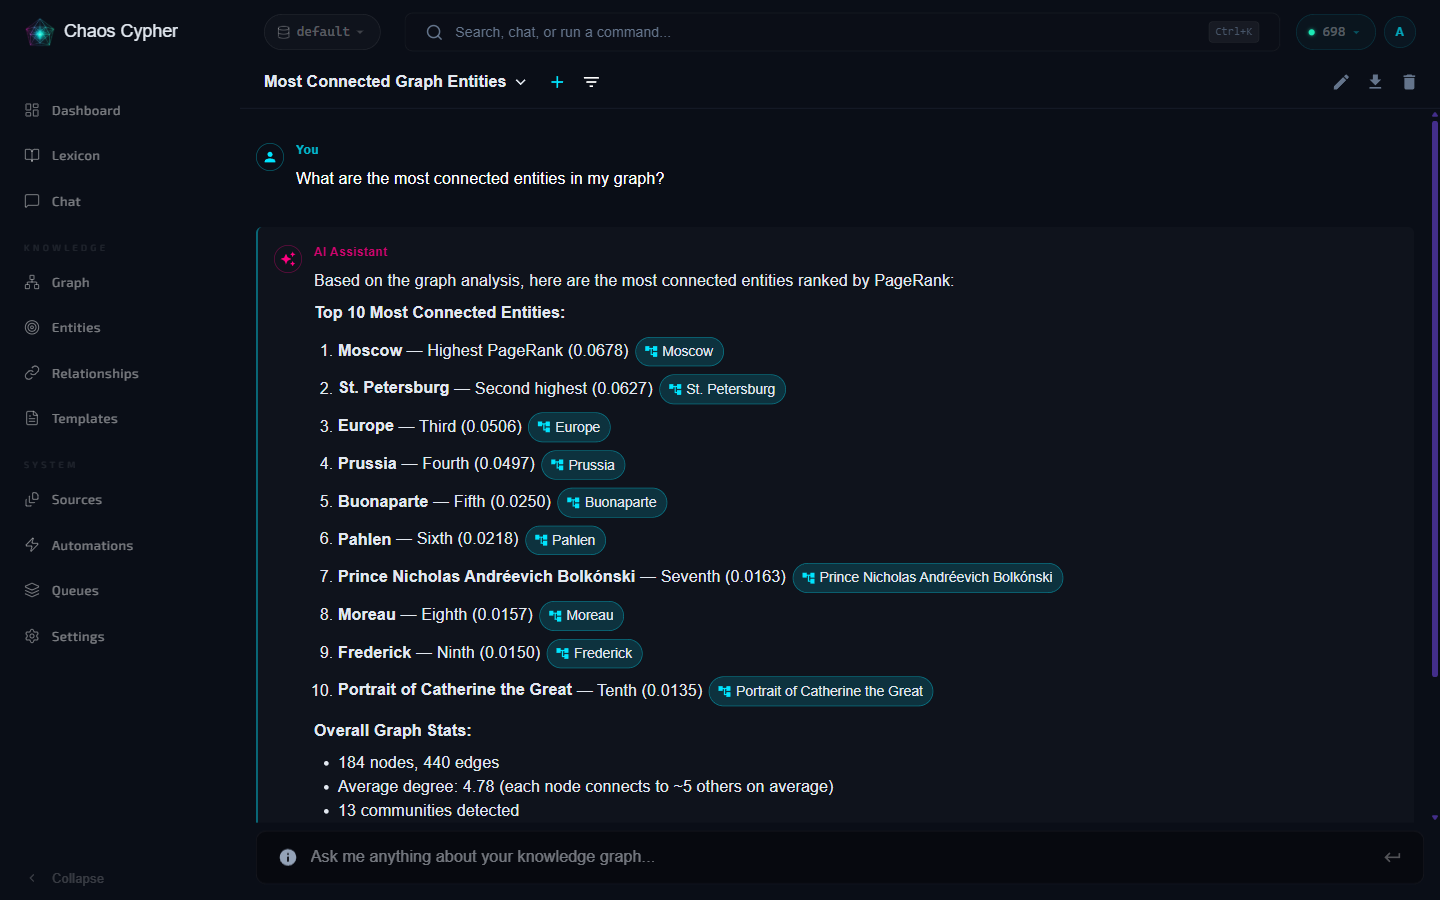
Open the chat dropdown on a specific source to start a conversation scoped to that document only. The AI will only use content from that source.
# Quick one-shot question
chaoscypher chat "What are the key findings?"

# Interactive chat session
chaoscypher chat
The CLI displays tool calls and citations inline as the response streams.
from chaoscypher_core import Engine

async with Engine("./data/databases/default") as engine:
    response = await engine.chat("What are the key findings?")
    print(response.content)
engine.chat sends the prompt directly to the configured LLM provider — it does not search your indexed content or return citations. For document-grounded chat with citations, use the Web UI, CLI, or the /chats REST API shown in the other tabs.
# 1. Create a conversation
curl -X POST http://localhost:8080/api/v1/chats \
  -H "Content-Type: application/json" \
  -d '{"title": "Quick Start Chat"}'

# 2. Submit a message for processing
curl -X POST http://localhost:8080/api/v1/chats/{chat_id}/send \
  -H "Content-Type: application/json" \
  -d '{"content": "What are the key findings?"}'

# 3. Watch the live response (SSE) — survives disconnects; the answer
#    is persisted to the conversation either way
curl -N http://localhost:8080/api/v1/chats/{chat_id}/events
The events endpoint returns Server-Sent Events with content, tool_calls, tool_result, and done events. The done event includes the final response with citations:
data: {"type": "content", "data": {"delta": "Based on", "accumulated": "Based on"}}
data: {"type": "done", "data": {"content": "Based on the analysis...", "chunk_citations": {...}}}
6. Manage databases
Chaos Cypher supports multiple isolated databases:
- Web UI
- CLI
- Python
- API
- Go to Settings → Databases
- Create a new database for a different project or topic
- Switch between databases — each has its own sources, graph, and chat history
# List all databases
chaoscypher db list

# Create a new database
chaoscypher db create research-project

# Switch to it
chaoscypher db switch research-project
from chaoscypher_core import Engine

# Each Engine instance targets a specific database
with Engine("./data/databases/research-project") as engine:
    stats = engine.get_stats()
    print(f"Nodes: {stats.nodes}, Edges: {stats.edges}")
# List all databases
curl http://localhost:8080/api/v1/databases

# Create a new database
curl -X POST http://localhost:8080/api/v1/databases \
  -H "Content-Type: application/json" \
  -d '{"name": "research-project"}'

# Switch to it
curl -X PATCH http://localhost:8080/api/v1/databases/current \
  -H "Content-Type: application/json" \
  -d '{"name": "research-project"}'
Response 200 OK (list databases):
{
  "databases": [
    {"name": "default", "size": 524288, "last_modified": "2026-03-09T14:22:10+00:00"},
    {"name": "research-project", "size": 262144, "last_modified": "2026-03-09T15:00:00+00:00"}
  ]
}
By default, Cortex binds to 0.0.0.0. Read the self-hosted threat model before exposing the service beyond loopback.
What's next?
- Sources guide — Learn about batch uploads, URL imports, and processing options
- Knowledge Graph guide — Manual node creation, templates, and graph exploration
- Chat guide — Scoped conversations, citations, and LLM configuration
- Configuration — Customize LLM providers, chunking, search, and more